Bit late on this one, as I thought I already had blogged this. A big bonus for us SharePoint people who love to use virtual environments.
http://blogs.msdn.com/sharepoint/archive/2008/08/18/update-on-virtualization-support-for-sharepoint-products-and-technologies.aspx
SharePoint is now fully supported in virtual environments! Go Hyper-V Go!
Thursday, October 23, 2008
Moving the Windows Internal Database
One big issue I have seen quite a bit of is that the Windows internal database that is stored within SharePoint is kept on the C: Drive. This can cause issues as most application servers have drive partitions that look similar to this:
C:\ Drive (Operating System) - 40gb
D:\ Drive (Data) - 160gb
Or something of that nature. Using Microsoft best practice the rough calculation to decide upon SharePoint database size is to take the corpus size (data size of all your content) and multiply this by 1.75. This will allow enough room for log files and also the search space requirements.
The issue with the Windows Internal database is the default database location is set to c:\windows\sysmsi\ssee\mssql.2005\mssql\data .
You can imagine the issues if you load 80gb of documents into SharePoint.
So here is what to do to move the databases, I would suggest moving them all however you can get away with moving just the content database and the search database.
1. First step is to either stop the SQL service or the SharePoint services (there are around 5). It is up to you which one to stop just make sure you have informed your users and also stopped the SharePoint IIS web site.
2. Next You will need to detach the database from SQL.
3. Open the SQL Management Studio as explained in my previous post and connect to the Windows Internal Database.
4. Expand databases and the Right click on the database you want to move, in this case WSS_Content, click on tasks and click on detach.

5. Now you can go into the c:\windows\sysmsi\ssee\mssql.2005\mssql\data folder and copy the physical database files. Make sure you copy BOTH files --> MDF and LDF.
6. Copy the files to an appropriate location (such as d:\sharepoint\data or d:\databases\sharepoint).
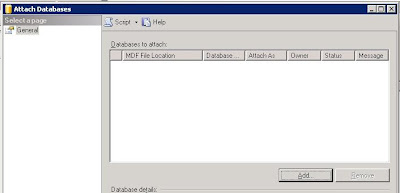
7. Go Back into Microsoft SQL Management Studio and Right Click on Databases and Click on Attach.
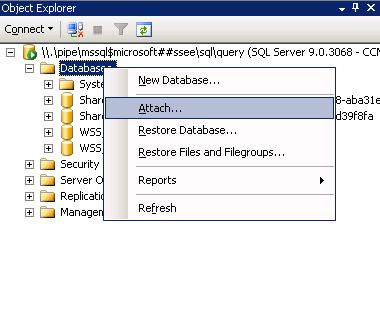
8. Now all youy have to do is click on 'Add' and then browse to the location you copied your WSS_Content database files to and add the MDF file (SQL will automatically pick up the LDF file).
9. Restart the SharePoint or SQL Services and then retart the IIS web sites.
10. The databases are now successfully migrated to a new location.
Repeat these steps for your search and admin config databases if you so chose.
Good Luck!
C:\ Drive (Operating System) - 40gb
D:\ Drive (Data) - 160gb
Or something of that nature. Using Microsoft best practice the rough calculation to decide upon SharePoint database size is to take the corpus size (data size of all your content) and multiply this by 1.75. This will allow enough room for log files and also the search space requirements.
The issue with the Windows Internal database is the default database location is set to c:\windows\sysmsi\ssee\mssql.2005\mssql\data .
You can imagine the issues if you load 80gb of documents into SharePoint.
So here is what to do to move the databases, I would suggest moving them all however you can get away with moving just the content database and the search database.
1. First step is to either stop the SQL service or the SharePoint services (there are around 5). It is up to you which one to stop just make sure you have informed your users and also stopped the SharePoint IIS web site.
2. Next You will need to detach the database from SQL.
3. Open the SQL Management Studio as explained in my previous post and connect to the Windows Internal Database.
4. Expand databases and the Right click on the database you want to move, in this case WSS_Content, click on tasks and click on detach.

5. Now you can go into the c:\windows\sysmsi\ssee\mssql.2005\mssql\data folder and copy the physical database files. Make sure you copy BOTH files --> MDF and LDF.
6. Copy the files to an appropriate location (such as d:\sharepoint\data or d:\databases\sharepoint).
7. Go Back into Microsoft SQL Management Studio and Right Click on Databases and Click on Attach.

8. Now all youy have to do is click on 'Add' and then browse to the location you copied your WSS_Content database files to and add the MDF file (SQL will automatically pick up the LDF file).

9. Restart the SharePoint or SQL Services and then retart the IIS web sites.
10. The databases are now successfully migrated to a new location.
Repeat these steps for your search and admin config databases if you so chose.
Good Luck!
SharePoint Windows Internal Database
A lot of the time when clients cannot afford SQL 2005 standard, SharePoint usually gets installed as a single server farm with an Windows Internal Database. The windows internal database is actually a version of SQL 2005 Express edition. It is actually preferable to use this internal database over a copy of SQL 2005 Express edition because you are not limited to 4gb with the internal database, as you would be if you used an external SQL 2005 Express instance.
Always keep in mind that you can connect to the Internal database using SQL Management studio express found here:
http://www.microsoft.com/downloads/details.aspx?FamilyId=C243A5AE-4BD1-4E3D-94B8-5A0F62BF7796&displaylang=en
When you download this you can connect to windows internal database by using the following server name:
\\.\pipe\mssql$micrsoft##ssee\sql\query
This will enable you to see the databases used inside the windows internal database. This is exactly the same as if you were using a standard version of SQL.
Enjoy!
Subscribe to:
Posts (Atom)


