Tuesday, February 1, 2011
SP2010 Non Dev Exams done
I finally got around to sitting my 70-668 IT PRO exam the other week. I have now passed 70-667 and 70-668 and am now a SharePoint 2010 IT PRO. I think the exam structure they have gone with this time around is better than the previous 2007 and WSS exams.
Friday, November 19, 2010
Real World Branding with SharePoint 2010 Publishing Sites
Andrew Connell has done up an excellent blog post on public facing branding in SharePoint 2010. A great read:
http://msdn.microsoft.com/en-us/library/gg430141.aspx
http://msdn.microsoft.com/en-us/library/gg430141.aspx
Monday, September 6, 2010
SharePoint 2010 Form Library Quirk
Working on a client's 2010 site the other day, I came across a slight quirk with SharePoint 2010 form libraries. The client had created a SharePoint site and wanted me to create some InfoPath 2010 forms and Nintex 2010 workflows. However when going to create the form library, the form library template under 'libraries' in the 'create' popup box was missing. So I started scouring around the site features and low and behold the feature that got me the 'Form Library' template back was the 'Team Collaboration Lists' site feature.
Sunday, May 30, 2010
Cascading Drop Downs with InfoPath 2010 Browser Forms
SharePoint 2010 InfoPath forms services in combination with InfoPath 2010 browser forms have enabled end users and developers to create cascading drop downs within browser forms without even thinking about a line of code!
So if you want to keep it simple or are not terribly technical follow these steps to create cascading drop downs within SharePoint 2010.
The first thing you will need is a SharePoint 2010 list to populate the drop downs. Basically it works like this: Each Item and it's respective columns will filter the items in the following drop downs. For this example I have created a 'location' list called 'suburbs'.
There are two other metadata columns that define the suburb: State and Country.
The way the cascading drop downs will work in InfoPath is that the first selection will be 'Country' which will then filter the second drop down, 'State' which in turn once slected, will give the user filtered option in the third drop down; Suburb.
The List
Custom list created with two additional metadata choice columns (Country and State).

List with some sample data:
 The Form
To create the cascading drop downs in the form you will first need to create 3 empty datafields.

Add the three drop downs of the fields to the form. To populate the form with the columns from the list create a new SharePoint list data connection, which can be found under the 'data' tab.
 Select the SharePoint server and then select the list. Select the 3 columns (title plus the two columns you created earlier).
 You can check the box 'Store a copy of the data in the form' if you would like to view the form in offline mode. Finish the wizard.
Now right click on the first drop down and go to Drop Down List Box properties. Select 'Get Choices from an External Datasource'. Select 'Suburb' (this will be automatically selected if it is your only external datasource). For the first 'Country' drop down select 'Country' as the value and display name and also check the box 'Show only entries with unique display names' (this will avoid duplication).

Now right click the 'State' drop down, follow the same procedure as before except this time select 'State' for value and display. However when you select the 'State' option, you will need to click on the 'Select XPath' from next to the 'Entries' box. This will allow you to filter the 'States' based on the selected Country.
 Click 'Add' to add a new filter. In the first drop down box you will need to select the value of the InfoPath field for 'Country' and then in the third drop down box you will need to select the corresponding data field from the SharePoint list data connection. We are basically saying here, filter the drop down of state when the Country drop down is equal to the country in the list.
Select the 'Title' drop down and then click on 'Select a field or group'.
 Change the datasource to 'Main', then select the field where 'country' is stored.
 Now the middle drop down can remain as 'Equals', click on the third drop down and click on 'Select a field or group'. This time from the '(Suburbs) Secondary Datasource' expand the list and select the 'Country' field.
 Click ok on all the dialogue boxes to make the changes, don't forget to click on the unique names check box. You can now text the form to see the first drop down filters the second. One thing you will notice is that if you select an option in the 'State' drop down it will remain even if you change the 'First' one, however the rest of the options will respect the filtering. This can be rectified using a rule on the first 'State' option.
However, first follow the procedure above to change the third drop down to display 'Suburb' fields and filter them agaisnt the field selected in the 'State' drop down box.
Now to create the rule that resets the other two drop downs when you reselect the first 'Country' one.
Right click on the 'Country' drop down and select 'Rules' > 'Manage Rules'. A new side panel will appear on the right which allows you to manage the rules of this particular field element.
 On the Rules Tab select 'New > Action' to create a new action rule. Name the rule something like 'resetDropDowns'. Click on the 'Condition' area to create a rule condition, change this to something like: 'Country is not blank'. Then click ok.
 Click on 'Add > Set a field's value'. Set each of the other two drop downs to 'nothing'. Do this once for each of the other drop down fields.
 The rule should look something like this:
 There you have it, you can now test your form's cascading drop downs.


So if you want to keep it simple or are not terribly technical follow these steps to create cascading drop downs within SharePoint 2010.
The first thing you will need is a SharePoint 2010 list to populate the drop downs. Basically it works like this: Each Item and it's respective columns will filter the items in the following drop downs. For this example I have created a 'location' list called 'suburbs'.
There are two other metadata columns that define the suburb: State and Country.
The way the cascading drop downs will work in InfoPath is that the first selection will be 'Country' which will then filter the second drop down, 'State' which in turn once slected, will give the user filtered option in the third drop down; Suburb.
The List
Custom list created with two additional metadata choice columns (Country and State).

List with some sample data:
 The Form
To create the cascading drop downs in the form you will first need to create 3 empty datafields.

Add the three drop downs of the fields to the form. To populate the form with the columns from the list create a new SharePoint list data connection, which can be found under the 'data' tab.
 Select the SharePoint server and then select the list. Select the 3 columns (title plus the two columns you created earlier).
 You can check the box 'Store a copy of the data in the form' if you would like to view the form in offline mode. Finish the wizard.
Now right click on the first drop down and go to Drop Down List Box properties. Select 'Get Choices from an External Datasource'. Select 'Suburb' (this will be automatically selected if it is your only external datasource). For the first 'Country' drop down select 'Country' as the value and display name and also check the box 'Show only entries with unique display names' (this will avoid duplication).

Now right click the 'State' drop down, follow the same procedure as before except this time select 'State' for value and display. However when you select the 'State' option, you will need to click on the 'Select XPath' from next to the 'Entries' box. This will allow you to filter the 'States' based on the selected Country.
 Click 'Add' to add a new filter. In the first drop down box you will need to select the value of the InfoPath field for 'Country' and then in the third drop down box you will need to select the corresponding data field from the SharePoint list data connection. We are basically saying here, filter the drop down of state when the Country drop down is equal to the country in the list.
Select the 'Title' drop down and then click on 'Select a field or group'.
 Change the datasource to 'Main', then select the field where 'country' is stored.
 Now the middle drop down can remain as 'Equals', click on the third drop down and click on 'Select a field or group'. This time from the '(Suburbs) Secondary Datasource' expand the list and select the 'Country' field.
 Click ok on all the dialogue boxes to make the changes, don't forget to click on the unique names check box. You can now text the form to see the first drop down filters the second. One thing you will notice is that if you select an option in the 'State' drop down it will remain even if you change the 'First' one, however the rest of the options will respect the filtering. This can be rectified using a rule on the first 'State' option.
However, first follow the procedure above to change the third drop down to display 'Suburb' fields and filter them agaisnt the field selected in the 'State' drop down box.
Now to create the rule that resets the other two drop downs when you reselect the first 'Country' one.
Right click on the 'Country' drop down and select 'Rules' > 'Manage Rules'. A new side panel will appear on the right which allows you to manage the rules of this particular field element.
 On the Rules Tab select 'New > Action' to create a new action rule. Name the rule something like 'resetDropDowns'. Click on the 'Condition' area to create a rule condition, change this to something like: 'Country is not blank'. Then click ok.
 Click on 'Add > Set a field's value'. Set each of the other two drop downs to 'nothing'. Do this once for each of the other drop down fields.
 The rule should look something like this:
 There you have it, you can now test your form's cascading drop downs.

Saturday, March 13, 2010
SP 2010 Masterpage on Team Site
I have noticed a little change from SharePoint 2007 in SP2010 as I have been playing with the master pages. If you create a Team Site by default you can no longer change the masterpage from 'Site Settings' / 'Look and Feel'. You must first now enable the Site Collection feature:
"SharePoint Server Publishing Infrastructure"
and the Site Feature:
"SharePoint Server Publishing"
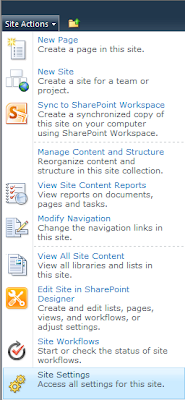
To do this go to 'Site Settings' under 'Site Actions':

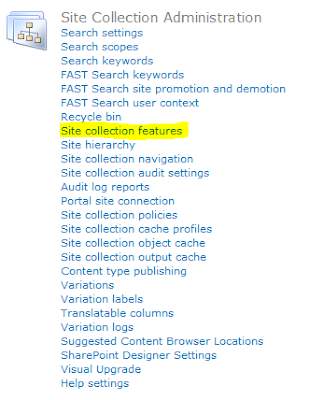
If you are at the Site Collection Level click on "Site Collection Features" under "Site Collection Administration":
 Click on 'Activate' next to 'SharePoint Server Publishing Infrastructure':
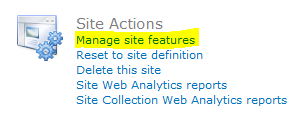
 Back in 'Site Settings' go to 'Manage Site Features' under the 'Site Actions' section:
 Click on 'Activate' next to the 'SharePoint Server Publishing' feature:
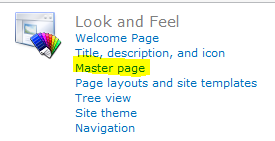
 You can now change your master page in site settings under look and feel:


"SharePoint Server Publishing Infrastructure"
and the Site Feature:
"SharePoint Server Publishing"
To do this go to 'Site Settings' under 'Site Actions':

If you are at the Site Collection Level click on "Site Collection Features" under "Site Collection Administration":
 Click on 'Activate' next to 'SharePoint Server Publishing Infrastructure':
 Back in 'Site Settings' go to 'Manage Site Features' under the 'Site Actions' section:
 Click on 'Activate' next to the 'SharePoint Server Publishing' feature:
 You can now change your master page in site settings under look and feel:


Wednesday, December 2, 2009
Newness in my Life
Hello All,
I have been a bit absent as of late on my blog due to two things in my life.
My wife recently gave birth to our first child two weeks ago! It has been quite the experience.
I have sat my PRINCE2 foundation and PRINCE2 practitioner exams which was also quite the intense experience.
The more knowledge the better I say!
I look forward to applying the methodology to current and future projects I am working on.
Will be back soon to update my SP Projects blog series.
Until next time.
Sunday, October 25, 2009
New look for MSDN
I am happy to announce that MSDN has finally changed their user experience of the web site by completey re-branding the site. I believe Microsoft have made an excellent move by doing this and think that it was long overdue!
Nice work.
Check it out at:
http://msdn.microsoft.com
Nice work.
Check it out at:
http://msdn.microsoft.com
Subscribe to:
Posts (Atom)


